Friday, April 29, 2011

Satin and Tulle Flower Tutorial

Last March, I posted about these flower clips I made:

Black Satin and Red Tulle

Gold Satin Ribbon and Cream Tulle
I wasn't able to prepare a tutorial then and to pepare one, I needed to make another clip. So I did (more than a month after, sorry about that). I'm meeting some girl friends from college later tonight and 2 of them have daughters around Andrea's age.

Anyway, for this clip, you will need:
I wasn't trying to be artistic with this shot... I was just trying to find the best lighting where you can see the cream tulle in the photo ;)
  • 1.5 yards of satin ribbon
  • 2 strips of tulle, around 1/4 inch wider than the satin ribbon, 1.5 yards
  • A piece of felt , cut into a circle, 2 inches in diameter (not pictured above) 
  • Needle and thread
  • Clip
  • Glue gun
Step 1: Singe the edges of your satin ribbon to prevent fraying.

Step 2: Layer your satin ribbon and 2 strips of tulle into one strip. Position on to the felt and place a few stitches to keep it in place.

Step 3: Fold your strip of ribbon and tulle to make a pleat and secure the fold/pleat with a couple of stitches.

Step 4: Continue making folds/pleats with your strip of ribbon and tulle around the edge of the circle felt, securing each fold with a few stitches.

Step 5: After making a complete circle, continue folding/pleating the satin ribbon and tulle to make a smaller circle.


Step 6: Continue folding and pleating to make smaller circles until the free space at the center becomes too small to add another layer. Cut off any excess ribbon and tulle and singe the edge of the ribbon to prevent fraying. The fold the edge of the ribbon and tulle inward to hide it and secure with a couple of stitches.

See? from the photo, you can't see the edge of the ribbon and tulle because it is folded inward.
Step 7: Using your glue gun, glue a button or other embellishment at the center. I used pearl beads for mine.

Step 8: Before you add your clip to the back of the flower, you can cut another circle of felt to hide the stitches. Sometimes I do...sometimes I don't (when my stitches are even and pretty :). Anyway, you can glue your clip or pin at the back.

A pretty pink bow for a pretty little girl.
I did say I have 2 friends with little girls right? So I made another one... I used a wider strip of satin ribbon this time, and no tulle.
A pretty pink satin bow for another pretty little girl.
The process is the same only for the center, instead of sewing the edge of the satin ribbon inward, I twisted it into a circle and used hot glue to secure it. It became the 'nest' for the big pearl bead I glued to the center.

My other friend has a little boy, and I initially wanted to make a bow tie for him like this Li'l Mister Bow Tie from Delia Creates. I had the the perfect fabric for it too... but I didn't have the time to make one (a little busy this week and Andrea has been staying up late so no free time in the evening) so he's getting a toy instead.

I can't wait to see my friends! It's been years since our little group was complete. The last was before any of us were married I think. And now... we all have kids! And this will probably be the last in a long time since one of them is moving to Dubai in June :-/ Anyway, last post for the week for me. Hope you all have a great weekend!

I am linking up to the following link parties:
Free for All at Young and Crafty | K.I.S.S. at The Tattered Tag | Sundae Scoop at I Heart Naptime | Sunday Showcase Party at Under the Table and Dreaming | Not Baaad Sundays at Lamb Around | Just Something I Whipped Up at The Girl Creative | Making Monday Marvelous at C.R.A.F.T | Craftastic Monday at Sew Can Do | Made With Love Monday at Sew Chatty | Motivate Me Monday at Keeping It Simple | A Round Tuit at Crafting My Way to Success | Inspire Me Monday at Singing Three Little Birds | Amaze Me Monday at Dittle Dattle | DIY Project Parade at The DIY Showoff | Think Pink Sundays at Flamingo Toes | Market Yourself Monday at Sumo's Sweet Stuff | Manic Monday Link Party at Sew Happy Geek | Take a Look Tuesday at Sugar Bee Crafts | Tutorial Tuesday at Hope Studios | Handmade Tuesdays at Ladybug Blessings | Tuesday To-do Party at The Blackberry Vine | Tip Me Tuesday at Tip Junkie | Tuesday Party at Running with Glitter | Get Your Craft On at Today's Creative Blog | Show Me What Ya Got at Not JUST a Housewife | Sew Cute Tuesday at Creative Itch | Show and Tell at Blue Cricket Designs | Your Whims Wednesday at My Girlish Whims | Will See It Wednesday at Fabric Bows and More | Share the Wealth Wednesday at Laugh, Love, and Craft | We Did It Wednesday at Sew Much Ado | Wicked Awesome Wednesday at Handy Man, Crafty Woman | A Marvelous Mess at Marvelously Messy | Sugar & Spice at Seven Thirty Three | Whatever Goes Wednesday at Someday Crafts | Hoo's Got Talent at Night Owl Crafting | Strut Your Stuff at Somewhat Simple | Creative Juice at Momnivore's Dilemma | Get Your Brag On at Gluesticks | Thrifty Thursday at Saved By Love Creations | Wednesday Link Party at Tea Rose Home | A Crafty Soiree at Katie's Nesting Spot | Transformation Thursday at The Shabby Chic Cottage | Commercial Break Thursday at Suzy's Artsy Craftsy Sitcom | Thrilling Thursday at Paisley Passions | Catch a Glimpse at A Glimpse Inside | Feature Yourself Friday at Fingerprints on the Fridge | Friday Favorites with Inspiring Creations | Lovely Crafty Weekend at Lovely Crafty Home | Weekend Wrapup Party at Tatertots and Jello |

Thursday, April 28, 2011

Guest Posting at My Crafty Condition with Anthro-Inspired Earrings: Memory Keeper Drops

I'm guest posting today over at My Crafty Condition with another project inspired by Anthropologie.

Memory Keeper Drops Earrings

A closer look at the earrings:

If you want to make these earrings, head on over to Kalen's at My Crafty Condition for the tutorial.


While you're there, make sure to check out Kalen's other projects. She has great wall art ideas like this Microsoft-inspired wall art:
Before I end my post... let me just share that it's so hot here. Like really, really humid hot :-/ Like I said... Summer is here!!

I am linking up to the following link parties:
Strut Your Stuff at Somewhat Simple | Creative Juice Thursday at Momnivore's Dilemma | Get Your Brag on at Gluesticks | Thrifty Thursday Blog Hop at Saved By Love Creations | Whatever Goes Wednesday at Someday Crafts | Thrilling Thursday at Paisley Passions | A Crafty Soiree at Katie's Nesting Spot | A Glimpse Inside at Catch a Glimpse | Commercial Break Thursday at Suzy's Artsy Craftsy Sitcom | Feature Yourself Friday at Fingerprints on the Fridge | Free for All at Young and Crafty | K.I.S.S. at The Tattered Tag | Sundae Scoop at I Heart Naptime | Sunday Showcase Party at Under the Table and Dreaming | Not Baaad Sundays at Lamb Around | Just Something I Whipped Up at The Girl Creative | Making Monday Marvelous at C.R.A.F.T | Craftastic Monday at Sew Can Do | Made With Love Monday at Sew Chatty | Motivate Me Monday at Keeping It Simple | A Round Tuit at Crafting My Way to Success | Inspire Me Monday at Singing Three Little Birds | Amaze Me Monday at Dittle Dattle | DIY Project Parade at The DIY Showoff | Think Pink Sundays at Flamingo Toes | Market Yourself Monday at Sumo's Sweet Stuff | Tutorial Tuesday at Hope Studios | Handmade Tuesdays at Ladybug Blessings | Tip Me Tuesday at Tip Junkie | Tuesday Party at Running with Glitter | Get Your Craft On at Today's Creative Blog |

Wednesday, April 27, 2011

Old Sarong to Simple Summer Dress

Before we left for our trip last week, I was planning to make matching summer dresses for my daughter and my niece. I looked around my stash to find fabric that looks 'summery' and is big enough for 2 dresses and I found this:

It's an old sarong I got from a store in White Beach, Puerto Galera several years ago. If you're wondering what a 'sarong' is, it's a length of fabric that is used as a beach cover up. I Googled some images and found this:

These are actually the most common designs and you can buy one from most beaches here for around P100 (approx $2.50). The sarong I'm using above... I remember that it was on sale (yeah, they have sales on beaches too). It was like buy 3 for only P200 (approx $5) at the time. The design choices were limited and that red one was the nicest.

Anyway... for my summer dresses, I wanted to incorporate the dolphins to the tassels. I one of Andrea's dresses as my pattern. I laid it on top of the sarong, making sure that the designs I wanted are inside the lines of the dress. I traced it out and cut the front and the back pieces. For my niece, she's a year older than Andrea, I just made the front and back pieces a little bigger than Andrea's size.


I didn't have to hem the edge of the skirt because I wanted to keep the tassels. So first I sewed the sides. And then I hemmed the arm holes and the neckline. And the dress was done.
She was playing and did not appreciate being pulled away from her toys for a few minutes so I could take this photo.
Very easy to do! Since I wanted to incorporate the sarong design from the dolphin down to the tassel... the dress ended up a little longer than I wanted but Andrea didn't seem to mind.

When we went to the water park, Andrea spent most of the time taking a nap or wading in the pool. My niece did too. So they never got to wear it, therefore no picture of them with their matching dresses. Tsk tsk. Maybe next time.

I am linking up to the following link parties:
We Did It Wednesday at Sew Much Ado | Sew Cute Tuesday at Creative Itch | Show and Tell at Blue Cricket Designs | Your Whims Wednesday at My Girlish Whims | Make It, Wear It at The Train to Crazy | Wicked Awesome Wednesday at Handy Man, Crafty Woman | Wednesday Link Party at Tea Rose Home | Will See It Wednesday at Fabric Bows and More | Strut Your Stuff at Somewhat Simple | Creative Juice Thursday at Momnivore's Dilemma | Get Your Brag on at Gluesticks | Thrifty Thursday Blog Hop at Saved By Love Creations | Transformation Thursday at The Shabby Chic Cottage | Whatever Goes Wednesday at Someday Crafts | Thrilling Thursday at Paisley Passions | A Crafty Soiree at Katie's Nesting Spot | A Glimpse Inside at Catch a Glimpse | Feature Yourself Friday at Fingerprints on the Fridge |

Tuesday, April 26, 2011

Summer/Spring Hat Refashion

I'm saying Summer *slash* Spring because it's summer here, and spring in other parts of the world so let's say it's for both so no one feels left out. 

Anyway, my family has this tradition of going on short vacations during non-working days of the Holy Week. My mom picks the location all the time, which is always just a few hours from the city, because... well... she pays. Thanks mom! :D I bought a hat with a brim for Andrea last year, to shield her eyes from the sun when we leave the car. Well... I said that this country is not big on wreaths... it's not big on hats either. I looked and looked and couldn't find a hat with a brim for babies. Finally, I found this cheap hat at the mall:

It was a little big for Andrea last year, and still is this year, and I wasn't happy with the embroidered design (I have no idea what CB stands for), but it was only P50 (approx $1.25) and it has a brim so I decided it would have to do. So before we left for our trip this year, I remembered the hat and decided to dress it up a little.

I took some of my fabric flower brooches, pinned it over the embroidery to hide it and...

Here's a closer look at the flowers:

Much, much better! The 2 singed flowers are the ones I used on my shirt refashion here. The pink flower, well... I have this short, sentimental story about it so bear with me.

See, it was my first 'sewing' project, and it was the project that officially 'launched' my blog as a crafts blog last year. It was part of my first refashion project when I added that flower to one of Andrea's dresses:
My first refashion project
Andrea grew out of the dress, but I wanted to keep the flower. Since it was sewn directly on the dress, I decided to cut it out, glue a piece of felt at the back, added small strips of the eyelet lace to make them look like leaves, and added a clip and a pin so we can use it as a clip and a brooch. As for the rest of the dress... it was made of strips of wide eyelet lace, sewn together so I decided to remove the stitches and I ended up with 3 short strips of dark green eyelet lace.
I can't wait to use them for a project!

Ok, back to Andrea's hat. Here's a picture of her wearing it:
It was taken using my phone, inside the car... and since the car was moving, my photo was a little blurry :-/

Here are some photos from the water park we went to.
That's Andi's grandma (a.k.a. my mom) with her at the bottom center photo. And that's Andi's daddy (a.k.a. hubby) with her at the bottom right photo.

I am linking up to the following link parties (whew, I missed link parties last week! I missed seeing that you guys were up to!):
CraftOManiac Monday at CraftOManiac | Just Something I Whipped Up at The Girl Creative | Making Monday Marvelous at C.R.A.F.T | Made By You Monday at Skip To My Lou | Craftastic Monday at Sew Can Do | Made with Love Monday at Sew Chatty | Motivate Me Monday at Keeping It Simple | Craft Couture Monday at Craft Couture | A Round Tuit at Creating My Way to Success | Market Yourself Monday at Sumo's Sweet Stuff | Inspire Me Monday at Singing Three Little Birds | The DIY Showoff | Manic Monday at Sew Happy Geek | Take a Look Tuesday at Sugar Bee Crafts | Handmade Tuesdays at Ladybug Blessings | Tuesday Party at Running with Glitter | Get Your Craft On at Today's Creative Blog | Tuesday To-do Party at The Blackberry Vine | Show Me What Ya Got at Not JUST a Housewife | We Did It Wednesday at Sew Much Ado | Linking Party at Passionately Artistic | Show and Tell at Blue Cricket Designs | Your Whims Wednesday at My Girlish Whims | Make It, Wear It at The Train to Crazy | Wicked Awesome Wednesday at Handy Man, Crafty Woman | Wednesday Link Party at Tea Rose Home | Will See It Wednesday at Fabric Bows and More | Strut Your Stuff at Somewhat Simple | Creative Juice Thursday at Momnivore's Dilemma | Get Your Brag on at Gluesticks | Thrifty Thursday Blog Hop at Saved By Love Creations | Transformation Thursday at The Shabby Chic Cottage | Whatever Goes Wednesday at Someday Crafts | Thrilling Thursday at Paisley Passions | A Crafty Soiree at Katie's Nesting Spot | A Glimpse Inside at Catch a Glimpse | Feature Yourself Friday at Fingerprints on the Fridge |

Monday, April 25, 2011

Blog Award!

Sorry for the lack of posts the past week. It's been a little busy with my nanny on vacation and then we went to a water park for a couple of days with my family. So now I'm back, with a few new projects which I will be posting this week. But first, I want to share a few things I'm thankful for:

1. The reason for Easter Sunday. So with all the Easter Eggs and Easter Bunnies (and in the case  here in my country, beaches and beach parties!) I hope we Christians remember that the reason why we celebrate Easter Sunday is to commemorate the day our Savior Jesus rose from the dead after he died to save us. 
Speaking of Easter Bunnies... I just want to share this photo of Andrea wearing her bunny ears :)
 2. Summer is here! While it's still Spring in some parts of the world, in my little corner, it's summer! Summer usually starts around March for us, but we have been given a wet summer forecast due to La Niña. It's not as hot this year (which is good) and it gets unusually cold very early in the morning (unusual for Manila here in the Philippines), and it rains... which is just weird for March and April here..But since last Saturday, we've been getting heat spells that makes you want to faint when you stay out in the sun too long which only means one thing... SUMMER!! 

This ship is part of the kiddie pool and I couldn't resist having a "Titanic" photo with Andrea ;)
 3. I've been given a blog award! 
I first received this award from Kathryn from The Dragon's Fairy Tail a couple of weeks ago but I haven't finished my list of 15 new blogs yet. And then Amy from One Artsy Mama, gave me the award last week too! Thank you so much ladies! Now, I'm ready to pass on the loooove!

Here are the rules for receiving this award:

1. Thank the person who gave you the award and link back to them in your post. So THANK YOU Kathryn and Amy! Both Kathryn and Amy have adorable boys and their site features great projects for little boys so make sure you check out their blogs.

2. Tell us 7 things about yourself. Here goes:
  • I have a 1-year-old daughter named Andrea;
  • I'm from the Philippines and currently living in Manila;
  • I have never seen Mod Podge before because there seems to be none here (disgraceful, I know!);
  • My favorite movie of all time is Gone with the Wind... but other movies I love are, the Star Wars series, Black Hawk Down, We Were Soldiers, The Patriot, and uh... Finding Nemo ;)
  • I love swimming, but last time I did laps was years ago because now, I just don't have the time :(
  • I just checked and I have 811 friends on Facebook! (my personal account). And you know what... I think I know each and everyone of them (because I don't add anyone I don't know).
  • I have a self-imposed 'No Internet on Weekends' policy (I work during weekdays so weekends are reserved for quality time with my princess).
3. Share the award with 15 blogs you just discovered. (Kathryn said 15, and Amy said 6, so to comply with both rules, let's go with the higher number). Some of the blogs on my list I discovered a while back, but I love them so they're on my list anyway. And some I discovered from link parties whose projects I love and bookmarked for future use :) Here are my 15 blogs:

Check out their blogs everyone!

Monday, April 18, 2011

Tote Bag Makeover

Since this bag from Anya Hindmarch was released sometime in 2007, several business and organizations started releasing their own reusable shopping bags made of cloth.

I have a small collection of reusable shopping bags which I get from malls, supermarkets, boutiques. I always keep one in my purse for when I have to go to the grocery after work or buy something at the mall. I like to think that since 2007, I have done my part to reduce the use of plastic. 

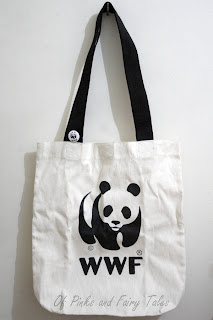
Anyway, I also have several of these bags from WWF. My husband works for WWF (which is really cool because they get to a lot of cool stuff and it's for work!) and they sell these and give some away on some of their events (as of this writing, I think I have 4 reusable bags from WWF). Since I don't really use all of them, I decided to find a use for some of my favorites.

This is one of my favorites:
This is made of canvas and the print is just their logo, no other text like the other ones. I find their panda logo cute and I thought I can make this shopping bag into a tote bag in a few simple steps!

Step 1: It was a little deep so I cut off around 2 inches off the bottom and hemmed it close.
Step 2: Add lining with pockets. I just used the shape of the bag as pattern to make my lining.

Step 3: I added a magnetic closure. I just looked for 2 magnets that are the same shape (I found 2 square ones in my husbands junk pile... I don't know where they came from but I thought they looked pretty. I put one inside the top seam on the front of the bag. Then I created this small flap by sewing 3 grosgrain ribbons together and burning the edges. I glued the other magnet to the flap, leaving it exposed since it looks nice. Then I added a little stitching on each side of the magnet.
that small square thing is a magnet
Step 4: I added a zipper... YES, this is the first time I used a zipper in a sewing project and I had to use the seam ripper several times but I did it!!! I added the zipper as an after thought, several hours after I thought I was finished with the bag so I wasn't able to take a picture. Anyway, I will be honest in saying that it doesn't really look pretty since the way I sewed it on the bag was uneven, but I say not bad for a first attempt.

So here's my finished tote:
You can't actually see a lot of difference from the photo since I didn't really change the design. But it's a little smaller and because of the lining, keeps its shape better when hanging from your shoulder.

I have another project involving my other reusable shopping bags but I'll be honest, I haven't started yet. This week is Holy Week in the Philippines, Maundy Thursday and Good Friday are non-working holidays (and on Good Friday, local TV stations go off the air, malls, groceries, restaurants, and other establishments are closed) so most people go on vacations... including me :) So I might not be able to post anything else this week but I promise I'll have something good for you guys next week.
Before I sign off for the week... let me leave you with a little preview. Aside from my other reusable bag project, I need to do something about these pendants:
A shell pendant from one of my old necklaces.
Shell pendants I got from a souvenir shop somewhere in Monterey Bay, CA a few years ago when I went there on vacation.
And my husband has been working on his own project:
a dollhouse for Andrea!
He did not document his steps... and he started this very late at night 2 weeks ago so I wasn't able to take pictures of his progress but I will be sharing his finished project. This might be a little different from the doll houses you're used to seeing.

Thursday, April 14, 2011

Old Frame to Simple Bow Holder

I've been seeing bow holder ideas online a lot and I've been wanting to make one for Andrea's bows and clips. I like the ones made from frames... but I didn't have a frame. Or I thought I didn't... until I remembered this:

We used to have 2 fruit bowl paintings hanging on the wall in our dining area a while back. I think these were popular back in the 80's. I remember seeing fruit paintings in the walls of some of my friends' houses back then. The 2 we have were already in my husband's house before I moved in, but we took it down when we had the downstairs area repainted a few years ago. Since I put a cabinet against the wall where these used to hang, we never got to put them back and they lay hidden in our storage area, forgotten... until I had the dire need to make a bow holder and started hunting around for a frame.

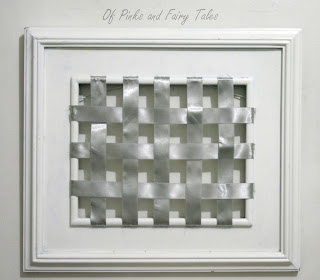
I removed the painting from the frame (and kept them... they aren't really my style but you never know when I might decide to decorate my kitchen and those fruit paintings might come in handy) and spray painted one white and one black. I decided to use the white one for my bow holder.
I glued satin ribbons across the frame, in a woven pattern, to hold the bows. It's a little small,  I would have preferred a bigger frame to  hold more bows... but I don't like spending much on decor so I work with what I have.

Since I don't have much surface area in my bow holder to hold all of Andrea's bows, I just took the bigger ones and clipped them to the satin ribbons:
Pretty! I hung the frame next to the mirror in Andrea's 'future' room/currently my craft room. I noticed the dominance of pink... I need to make Andrea bows in other colors.

I am linking up to the following link parties:
Commercial Break Thursday at Suzy's Artsy Craftsy Sitcom | Finished on the 15th at Favecrafts | Weekend Wrap-up Party at Tatertots and Jello | Not Baaaad Sunday at Lamb Around | Free for All at Young and Crafty | Sew Crafty Saturday at Wildflowers and Whimsy | Think Pink Sundays at Flamingo Toes | K.I.S.S. at The Tattered Tag | Sundae Scoop at I Heart Naptime | Sunday Showcase Party at Under the Table and Dreaming | CraftOManiac Monday at CraftOManiac | Just Somethig I Whipped Up at The Girl Creative | Making Monday Marvelous at C.R.A.F.T. | Craftastic Monday at Sew Can Do | Motivate Me Monday at Keeping It Simple | A Round Tuit at Creating My Way to Success | Inspire Me Monday at Singing Three Little Birds | Make It For Less Monday at Simply Cadence | Market Yourself Monday at Sumo's Sweet Stuff | Made By You Monday at Skip to My Lou | Craft Couture Monday at Craft Couture | Take a Look Tuesday at Sugar Bee Crafts | Handmade Tuesdays at Ladybug Blessings | Show Me What Ya Got at Not JUST a Housewife | Tuesday Party at Running with Glitter | Get Your Craft On at Today's Creative Blog | Tuesday To-do Party at The Blackberry Vine | Manic Monday at Sew Happy Geek

Wednesday, April 13, 2011

Guest Posting at Mine for the Making with my Vintage Style Eggs

I'm guest posting today at Mine for the Making as part of Kara's Spring Fling. I'm posting a tutorial on how to make this...

Vintage Style Easter Egg

... and a few other designs. If you haven't seen it yet, head on over at Mine for the Making to check it out.


And check out the other cool Spring ideas from the other guest bloggers too! It's all about Spring this week at Mine for the Making.


I am linking up to the following link parties:
Visit thecsiproject.com
Joining the Easter challenge at the CSI project
Easter Party Link-up at Someday Crafts | Handmade Tuesdays at Ladybug Blessings | Show and Tell at Blue Cricket Designs | Your Whims Wednesday at My Girlish Whims | Tuesdays To-Do at Blackberry Vine | We Did It Wednesday at Sew Much Ado | The Sunday Showcase Party at Under The Table And Dreaming | Linking Party at Passionately Artistic | Wednesday Link Party at Tea Rose Home | Whatever Goes Wednesday at Someday Crafts | Wicked Awesome Wednesday at Handy Man, Crafty Woman | Get Your Brag On at Gluesticks | Transformation Thursday at The Shabby Chic Cottage | Creative Juice Thursday at Momnivore's Dilemma | A Crafty Soiree at Katie's Nesting Spot | Commercial Break Thursday at suzy's Artsy Craftsy Sitcom | Friday Favorites with Inspiring Creations | Catch a Glimpse at A Glimpse Inside | Thrifty Thursday Blog Hop at Saved By Love Creations | Thrilling Thursday at Paisley Passions | Feature Yourself Friday at Fingerprints on the Fridge | Weekend Wrap-up Party at Tatertots and Jello | Strut Your Stuff at Saturday Mornings |

Tuesday, April 12, 2011

My Wreath Evolution

Wreaths aren't very big here in my country. We only have wreaths during Christmas. So when I first started checking out craft blogs, I was a little surprised to see that other people have wreaths for all seasons and occasions. The concept was new to me but I liked the idea of a non-Christmas wreath though. 

Let's rewind to a few years ago, before I discovered the joy of crafting. This mess was my first attempt at making a Christmas wreath. 
And see the wall behind it (it's the wall beside our staircase) was so empty except for our wedding portrait which, at the time, was the only item we have framed in our entire house. 

With all the inspiration I see on other blogs, I decided to try making a new wreath:
I have several of those wood wreath forms from old Christmas wreaths I found in a cabinet in our house when I moved in after my husband and I got married. I removed the old ribbons and other trim and kept the wreaths. I still have 3 more of those I think. I simply spray painted it white and added the flowers. It didn't turn out how I pictured it in my head (for one, I didn't have enough of those smaller flowers) but it was a good 'first' try (technically, second, but I am not counting the first one, haha).

Oh and the wall behind it, I now have a gallery of frames... no clear photo though, but you can see a little behind the wreath. Maybe next time.

I am linking up to the following link parties:
Transformation Thursday at The Shabby Chic Cottage | Free for All at Young and Crafty | Sew Crafty Saturday at Wildflowers and Whimsy | Think Pink Sundays at Flamingo Toes | K.I.S.S. at The Tattered Tag | Sundae Scoop at I Heart Naptime | Sunday Showcase Party at Under the Table and Dreaming | CraftOManiac Monday at CraftOManiac | Just Somethig I Whipped Up at The Girl Creative | Making Monday Marvelous at C.R.A.F.T. | Craftastic Monday at Sew Can Do | Motivate Me Monday at Keeping It Simple | Inspire Me Monday at Singing Three Little Birds | Market Yourself Monday at Sumo's Sweet Stuff | Made By You Monday at Skip to My Lou | Take a Look Tuesday at Sugar Bee Crafts | Handmade Tuesdays at Ladybug Blessings | Show Me What Ya Got at Not JUST a Housewife | Tuesday Party at Running with Glitter | Get Your Craft On at Today's Creative Blog | Tuesday To-do Party at The Blackberry Vine | Manic Monday at Sew Happy Geek

Monday, April 11, 2011

My Silly Bee

In case you noticed her... there's a bee posed at the foot of my Easter Egg Tree on my previous post. I made the bee a few weeks ago, before I started on all my other Easter decor. A few weeks ago... I had all these plastic eggs.. and all these materials and I was in the mood for some serious crafting...


...but I had no idea what to do. I had 'crafter's block'... you know, something like writer's block. I ran out of ideas. So I put all my stuff away and decided to make the beds in our bedroom instead. I noticed the bee in my daughter's pillow case looks like an egg. Without any other idea, I decided to try making a bee using one of my  yellow plastic eggs.

So I prepared these materials:
  • A small yellow plastic egg
  • Plastic eyes
  • 2 strips of black felt, around 0.5 inch wide. Each piece need to be long enough to go around the egg.
  • A small piece of gray felt
  • 4 small beads (not shown in the photo)
  • a glue gun
  • felt marker
Step 1: Glue the black felt around your egg. Cut off any excess felt.

Step 2: Glue the other strip of felt around your yellow egg. No photo but you should have something like a yellow-and-black-striped egg.

Step 3: Take your gray felt and cut 4-petal shapes. I didn't use a template. I did trial and error to get them the size I want for my bee's wings.

Step 4: Glue the 4 petal-shaped felt to the egg, position them like the wings of a bee.

Step 5: Glue the plastic eyes on one end of the egg... I used the wider end of the egg for the face, and pointed end will be the sting end.

Step 6: Glue 2 small beads on top of each eye. And then glue 2 more beads on top of those beads. Wait for the photo.. you will see what I mean.

Step 7: Using the felt marker... draw the mouth.

I glued a thin stip of felt on top of the 4 wing-shapes to hide the edges.

She looks a little unhappy... I was actually aiming for 'clueless', like I was feeling at the time, but I didn't know how to draw a mouth to make her look 'clueless'. She looked a little out of place there so I decided to perch her on my lamp so she can be near the flowers:

I was checking Martha Stewart's site a few days ago and saw she has a project like this too.. making animals from eggs. She posted tutorials on how to make a few more animals from eggs. This is simple enough to be a kid's craft project. Maybe when Andrea is a little older, we can try this together and we can make happier-looking bees :)

I got over my crafter's block a few days after I made my bee :) The table with the lamp and flowers has been re-decorated with my painted jars here. And those flowers, they have been cut up to decorate my moss projects and my Easter Egg Tree and my wreath (yeah... I've been cutting up this bunch and now it's all gone).

EDITED 2011-04-14:
Amy from One Artsy Mama tried this project with her 2-year old. Isn't it cool to be able to craft with your kid? I wish Andrea was old enough for us to do stuff like this too. They also made other cute animals from plastic eggs like this chick and this rabbit:
Sooo cute! She posted the tutorial for these 2 cuties at her site so be sure to check them out!


I am linking up to the following parties:
Inspire Me Monday at Singing Three Little Birds | Tuesday Party at Running with Glitter | Tutorial Tuesday with Hope Studios | Get Your Craft On at Today's Creative Blog | Show and Tell at Blue Cricket Designs | Your Whims Wednesday at My Girlish Whims | Tuesdays To-Do at Blackberry Vine | We Did It Wednesday at Sew Much Ado | The Sunday Showcase Party at Under The Table And Dreaming | Linking Party at Passionately Artistic | Wednesday Link Party at Tea Rose Home | Whatever Goes Wednesday at Someday Crafts | Wicked Awesome Wednesday at Handy Man, Crafty Woman | Get Your Brag On at Gluesticks | Creative Juice Thursday at Momnivore's Dilemma | A Crafty Soiree at Katie's Nesting Spot | Commercial Break Thursday at suzy's Artsy Craftsy Sitcom | Friday Favorites with Inspiring Creations | Catch a Glimpse at A Glimpse Inside | Thrifty Thursday Blog Hop at Saved By Love Creations | Thrilling Thursday at Paisley Passions | Feature Yourself Friday at Fingerprints on the Fridge | Finished on the 15th at FavecraftsWeekend Wrap-up Party at Tatertots and Jello